This article is published in "Creative Photography" Quarterly Magazine, No. 6, Spring 2006, Tehran.

|
|
Digital Technology opened a new world to photographers. During its development, new products were manufactured to replace film technology. But, do the designers and manufacturers know the different applications of these new productions?
Scanner was made to make picture from photos and texts. Later, it was used to take pictures from old documents, photos or pictures to make a digital file, which was done before by a film camera, copy stand and 32 ASA negative film. But, its application still didn’t finished. Using scanner instead of camera was continued. Things, which their picture of their surface was mentioned, put on scanner: tile, ceramic… Advertising companies and graphic designers, as well as photographers, put tiles on the flat of scanner and by using Photoshop made ads.
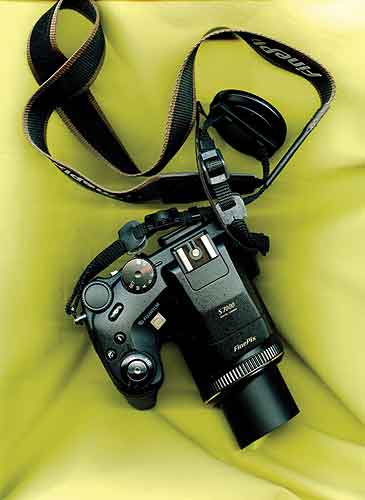
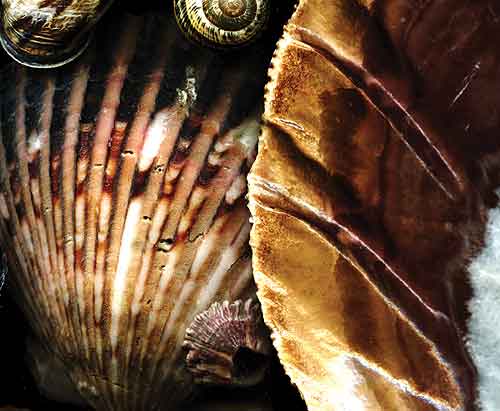
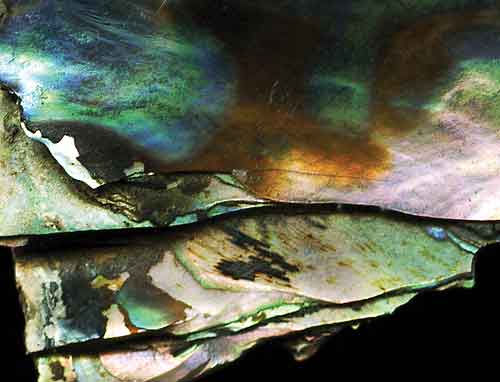
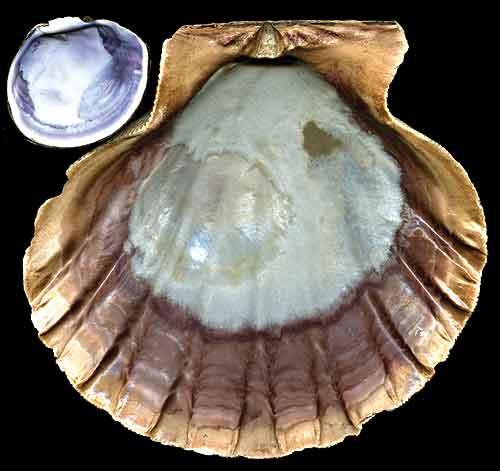
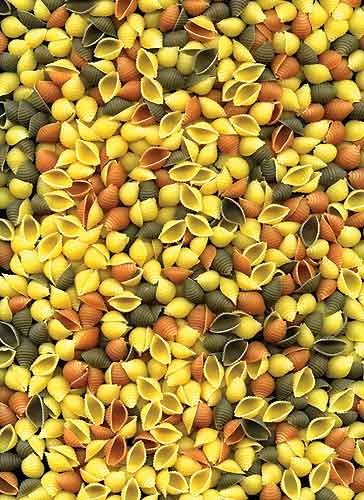
To test, I used from an Epson 1670 Scanner. I started with the subjects with small dimensions, as shells and I added the dimensions with different subjects little by little. For the last test, I put a camera on the scanner. The result was good. Scanner acted as a camera.
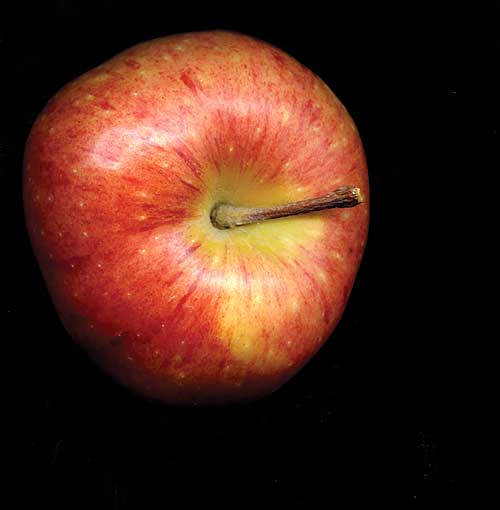
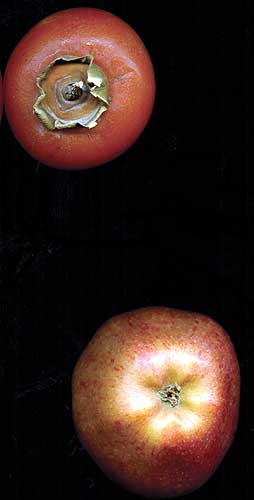
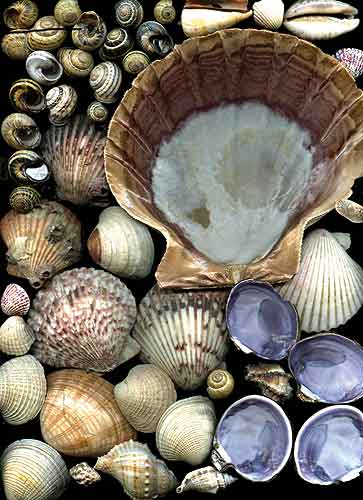
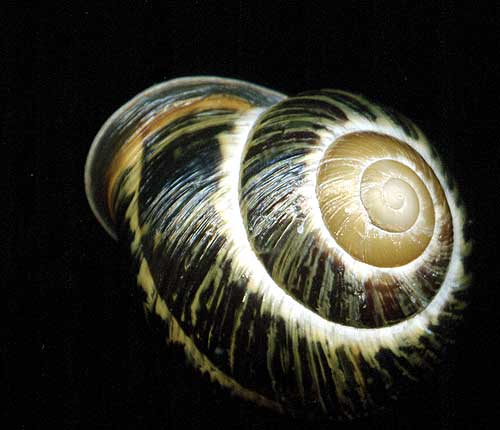
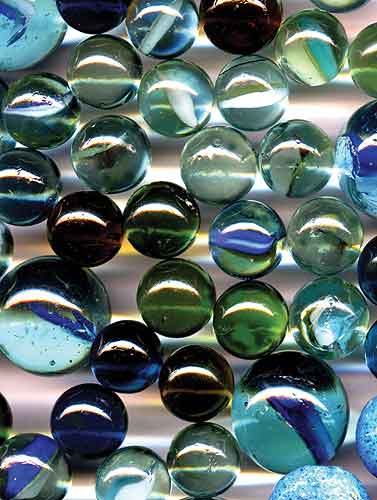
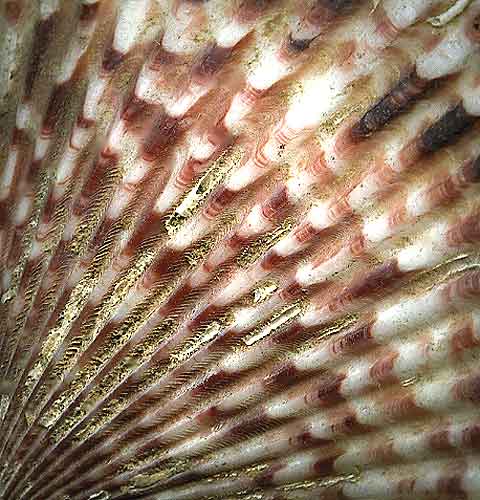
I put some shells on the flat plate of the scanner. First, I put a black board on the shells. Then, I did it with the board. The result was almost the same, but the first was a little better. The background was black in both methods. If we don’t want the black space between the parts (shell, spaghetti…), we can reduce it by filling it out by some other shells… Unless for glass, liquids (in glass vessels), metals and some dark things, it was desirable.
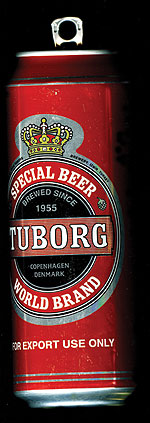
White background is suitable for metals, glass and liquids. Choosing background for dark subjects is mostly based on personal taste. Yellow background is suitable for a black camera. Due to the lightening of scanner, always we should correct the color of the background, or we can change it complete by Photoshop. Using textiles as the background is not always accepted, because it texture would be shown in detail, but fine textile has a rather good result.
Due to the high light of scanner, small dust (on the subject, on the flat of scanner or on the background) would be photographed. If there’s no background, and the door of scanner is open, dusts over the space of scanner would be photographed too. So, we should clean always the subject and the scanner.
Photos are fine, until 2 to 3 cm over the flat. More sharpness could be accessed by using Photoshop (Sharpness Key), but dusts will be determined more and we can see some white points in the background. Anyway, it should be corrected by Photoshop too.
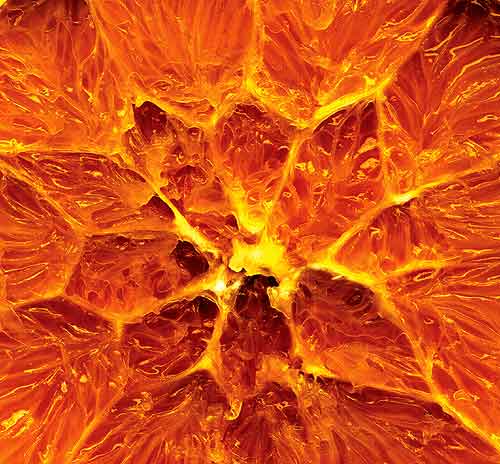
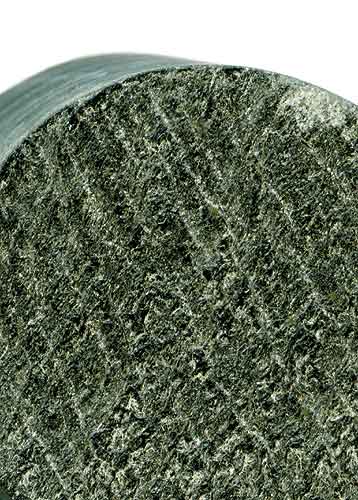
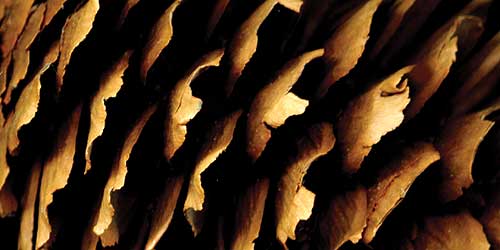
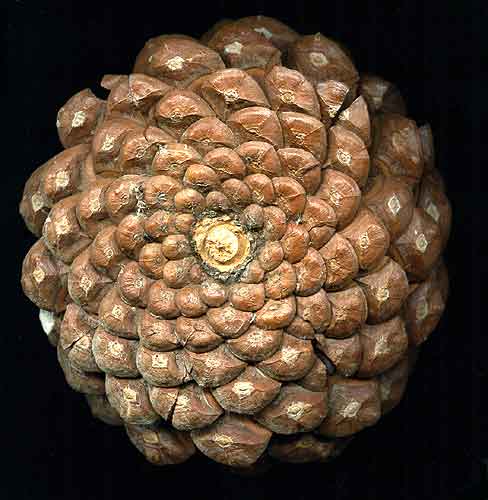
As we can choose the desired dpi in this method of photography (with better scanners, this ability increases), we can take photos of details. By using resolution of 3200, we can take picture from the details of a 2x2 cm stone. We can have fine details of the texture, which is itself a Digital Painting, as well as a good Macro photography. Camera could not take such a photo.
The main difference this method of photography with taking photos by a camera is that we cannot control the light. Scanner acts as the photographer. But, the photographer can control it somehow by changing the location of the subject. This method is very useful in advertising photography, which needs high light, in Macro Photography to take details, and for painters to have abstract pictures. Photographer will develop it in their work!
With creative use of scanner, the photographer could create artistic works, even if there’s limited control on the lightening of scanner. He/she can create new different work, which is completely different from that is taken by a camera. In macro photography, scanner can take detailed fine pictures, which the camera couldn’t. Complete control on changing color, contrast and level of the subject before scanning is available, more powerful than the white balance of a digital camera.
Do not forget:
1- Clean the subject and remove its dust completely!
2- Clean the flat plate of scanner. A hair-drier will remove the dust well.
3- Put the subject very slow on the flat of scanner, so the glass would not crushed.
4- Do not put heavy things on the scanner.
5- If you scan wet or oily things, clean the glass as soon as possible.
6- Using no background results a homogenous black color of it.
این مقاله در مجله
عکاسی خلاق
- بهار 1385 چاپ شده است.
|
|
|
دیجیتال با عرضه محصولات جدید، عرصه نوینی را به روی عکاسان باز نمود. تولید ابزار جدید در روند تکامل دیجیتال و با هدف مشخص جایگزین کردن و تکامل نگاتیو مسیر خود را طی می کند. امّا آیا خود طراحان و تولیدکنندگان از کاربری های متفاوت محصولات جدید آگاهی کامل دارند؟
اسکنر برای تصویر برداری از نوشته ها و عکس های موجود تولید گردید. بعدها، این وسیله برای تصویر برداری از مستندات قدیمی و ایجاد بایگانی دیجیتالی، چه عکس عکاسان، چه مکاتبات اداری... مورد استفاده قرار گرفت؛ کاری که قبلا ً توسط دوربین نگاتیو، سه پایه کپی و فیلم سیاه و سفید32 ASA انجام می شد. امّا کارکرد این وسیله درهمین جا خاتمه نیافت. استفاده از اسکنر به جای دوربین مسیر خود را ادامه داد. کالاهایی که تصویر سطح آنها مورد نظر بود، روی صفحه اسکنر قرار گرفتند: کاشی، سرامیک... شرکت های تبلیغاتی و گرافیست ها، کاشی و سرامیک... را روی صفحه اسکنر گذاشتند و با استفاده از محصول آن در فتوشاپ آگهی های تبلیغاتی ساخته شد.
از یک اسکنرEpson 1670 برای تست و گسترش این روند استفاده کردم. اسکن را از اشیائی که بعد کمتری داشتند (مثل صدف) شروع کرده و با استفاده از اشیاء مختلف ضخامت را افزایش دادم. به عنوان آخرین آزمایش یک دوربین عکاسی را روی صفحه اسکنر گذاشتم. نتیجه رضایت بخش بود. اسکنر مانند دوربین عمل می کرد و محصول کار آن عکسی قابل قبول بود.
چند صدف را روی صفحه اسکنر گذاشتم. ابتدا یک مقوای سیاه پشت آن قرار دادم. در مرحله بعد در اسکنر را باز گذاشتم و بدون مقوا اسکن کردم. نتیجه تقریبا ً یکی بود، ولی کیفیت اولی اندکی بهتر بود. در هر دو حالت زمینه عکس سیاه بود. تقریبا ً در مورد تمام اشیا این روش جوابگوست، بجز شیشه، فلزات و برخی اشیا تیره رنگ. در صورتیکه زمینه مشکی بین قطعات مورد نظر نباشد، با پر کردن فضای بین قطعات قرار داده شده روی صفحه اسکنر(صدف، ماکارونی...) می توان میزان آن را به حداقل رساند.
برای شیشه و فلز، مقوای زمینه سفید، نتیجه خوبی داشت. برای اشیاء تیره رنگ، انتخاب رنگ زمینه، بستگی به رنگ تیره موجود، نوع آن و هم چنین سلیقه شخصی دارد. یک دوربین عکاسی مشکی با زمینه زرد عکس خوبی است. با توجه به روش نورپردازی اسکنر، همواره رنگ زمینه، نیاز به تصحیح دارد و یا باید آن را با استفاده از برنامه فتوشاپ بطورکامل عوض کرد. استفاده از پارچه به عنوان زمینه همواره پاسخگو نیست، چرا که بافت آن نشان داده می شود.
در این روش، بخاطر شدت نور اسکنر، کوچکترین ذرات گرد و غبار روی شئ و یا صفحه اسکنر، عکاسی می شوند. در صورتیکه در اسکنر باز باشد و از مقوای زمینه استفاده نشود، ذرات گرد و غبار در فضای بالای اسکنر نیز تصویر برداری می شوند. به این دلیل همواره باید موضوع مورد نظر عکاسی و صفحه اسکنر را تمیز نمود.
عکس های گرفته شده تا ارتفاع 2 الی 3 سانتی متر بالای صفحه اسکنر از وضوح کامل برخوردارند. بهره برداری از وضوح بیشتر با استفاده ازSharpness در فتوشاپ عملی است، ولی این کار تصویر گرد و غبار موجود را نیز دقیق کرده و ذرات سفید رنگی در زمینه عکس پیدا می شوند، که تصحیح آن تا حد زیادی در فتوشاپ عملی است.
با توجه به اینکه در این روش عکاسی، امکان انتخابdpi عکس بطور کامل در اختیار عکاس است (استفاده از اسکنر با مدل بالاتر، این توانایی را افزایش می دهد)، امکان عکاسی از جزئیات عملی است. انتخاب رزولوشن 3200، امکان عکسبرداری از جزئیات یک سنگ کوچک 2x2 سانتی متر را عملی می کند. نتیجه با دقت بالا و کیفیت خوب، جزئیات بافت آن را نشان می دهد، که خود نوعی نقاشی دیجیتال هم هست، کاری که ممکن است با دوربین عکاسی عملی نباشد.
تفاوت اساسی این روش عکاسی با عکاسی با دوربین، عدم امکان کنترل نور موجود می باشد. اسکنر به جای عکاس تصمیم می گیرد؛ ولی عکاس با تغییر موقعیت شئ روی صفحه اسکنر، می تواند تا حدودی نور را تنظیم و عکس مورد نظر را بدست آورد. این روش جهت استفاده در عکاسی تبلیغاتی، با نور زیاد که تمامی کالا مشخص است، نتیجه قابل قبولی دارد. هم چنین در ماکروفتوگرافی نتایج بسیار خوبی بدست می آید و در تهیه تصویر جزئیات نیز نتایج دقیقی حاصل می شود.
هر چند که در این روش عکسبرداری کنترل نور در اختیار عکاس نیست، ولی استفاده خلاقانه از اسکنر، امکان تهیه کارهای هنری و علاوه بر آن کارهایی متفاوت با عکسهای دوربین عکاسی را به عکاس می دهد. در ماکروفتوگرافی امکان تهیه عکس از جزئیات یک شئ در حدی است، که دوربین عکاسی قادر به عکسبرداری از آن نمی باشد و طبیعتا ً نتیجه کیفیت بسیار خوبی دارد.
فراموش نشود:
1- سوژه مورد نظر عکسبرداری کاملا ً تمیز و عاری از گرد وخاک باشد.
2- صفحه اسکنر تمیز باشد. با استفاده از سشوار می توان غبار روی صفحه اسکنر را بطور کامل برداشت.
3- اشیا به آرامی روی اسکنر قرار داده شوند، تا صفحه اسکنر خط نیافتد.
4- اشیا سنگین را روی اسکنر قرار ندهید.
در صورتیکه اشیای تر و خیس یا چرب را اسکن می کنید، بلافاصله صفحه اسکنر را تمیز نمائید.